Multigrain Sourdough Bread

Multigrain Sourdough Bread

  • Servings: 32 Servings
  • Difficulty: Easy
  • Print

Before Christmas, a co-worker offered me some sourdough starter. I had tried in the past and failed miserably. This time I had specific instructions on how to keep this starter alive. I will post below my newest version of the sourdough bread but there are a lot of recipes to come with sourdough starter and discard. I will also do a feeder cheatsheet for the starter but in the meantime I can say I’ve been having a lot of fun. This recipe starts with a starter that is ready to be used.

The Prep time is initially 30 minutes, then we have the stretch series that takes 2 hours and then the proofing of 14 hour to the final proofing of 3-4 hours

Ingredients

  • 200 gram of whole wheat flour
  • 800 gram of unbleached flour
  • 20 gram of salt
  • 50 gram raw sunflower seeds
  • 50 gram of pumpkin seeds (if salted, omit the salt)
  • 85 gram of flax seeds
  • 200 gram of sourdough starter
  • 725 gram of room temperature water
  • Corn meal for dusting

Nutrition Per Slice

  • Calories 168
  • Fat 7 g
  • Sugar 0 g
  • Carbohydrates 26 g
  • Protein 7 g
  • Fibre

Directions

  • Mix all ingredients and form into a ball.
  • Put in covered container and let sit on the counter for 30 minutes.
  • Now we do the first stretch. Fold the dough in half and roll into a ball. Do this 3 times and let sit for another 30 minutes.
  • Repeat the above 3 more times.
  • Let sit on the counter for 12-14 hours covered.
  • Put a bit of corn meal on your surface and cut the dough into halves.
  • Shape into a loaf and put in banneton basket for proofing. Cover with damp towel.
  • Let sit for 3-4 hours on the counter. If you only want to bake one bread, you can put the second one in the fridge for up to 4 days, making sure to keep the covering towel damp.
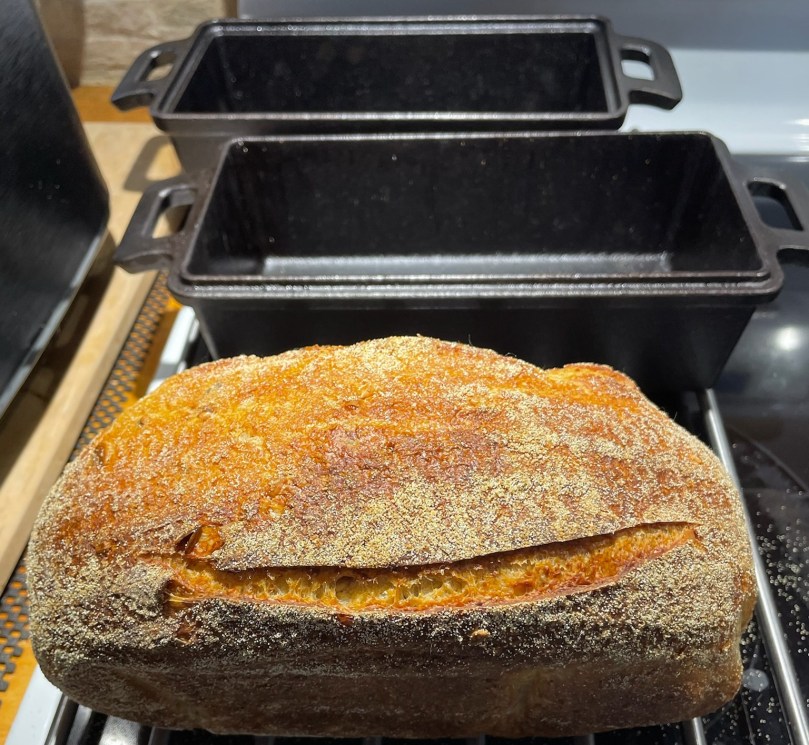
  • Preheat oven with cast iron bread loaf pan with cover at 460 degrees for 40 minutes. See picture of pans
  • Put loaf on parchment paper and place in hot cast iron bread loaf pan and cover.
  • Bake for 35 minutes.
  • Remove cover and bake for another 10 minutes.
  • Let cool for minimum 30 minutes before cutting.

As you see from the picture below, I’ve included one that shows my pans. They were inexpensive and I bought them on Amazon. Just make sure that they are treated before.

You will see in some future posts the original white sourdough bread but this is the one I have been making as it has more fiber. The advantage to sourdough is that it is diabetic friendly as it does not spike the sugar levels as does white bread.

Each loaf makes 15 to 16 slices. Now you don’t need as much to feel full as sourdough is denser to start with and with the whole wheat and nuts, you feel satisfied longer,

Those were my nuts of choice and of course you can vary them to your liking. I will keep experimenting and will adjust as I go and post those but if you find a new variation that you think I should try, please feel free to comment and let me know.

To keep bread nice, I use a beeswax bag. You can use a paper bag that you can fold closed.

In the meantime, there is just something special about the smell of fresh bread so have fun and make this bread your own.

Peanut Butter Granola Bars

Peanut Butter Granola Bars

  • Servings: 16 Servings
  • Difficulty: Easy
  • Print

A snack bar that is good, chewy, and healthy. A square was enough to fill that gap and felt like a sweet treat. (Vegan option below)

Ingredients

  • 2-1/2 cups of old fashioned oats
  • ¾ cup of peanut butter
  • 1/3 cup of honey or maple syrup. (both work well but the honey holds the bars together better)
  • 2 whole eggs
  • 45 grams of protein powder (I used chocolate)
  • 1 tbsp of mini chocolate chips
  • 1 tbsp of sliced almonds
  • 1 tbsp of chia seeds
  • 2 tbsp of pumpkin seeds

Directions

  1. Preheat oven to 350 degrees
  2. In a large bowl, combine all ingredients and mix well. (if your peanut butter is solid at room temperature, heat it in microwave for 10-15 seconds before adding to the mix).
  3. Line a 9×9 inch baking dish or pan with parchment paper. (this makes it easier to remove your bars from the dish)
  4. Transfer the mixture to the prepared dish and press firmly the mixture into the pan in an even layer. (the firmer you press the better the bars will stick together)
  5. Bake for 15-17 minutes or until the centre is baked through and the edges are just starting to brown. (start checking at 14 minutes as all ovens are a little different)
  6. Place on a cooling rack and let cool completely before cutting into 16 squares with a very sharp knife..

Nutrition Per Cookie

  • Calories 171
  • Fat 7.7 g
  • Sugar 7.4 g
  • Carbohydrates 20.5 g
  • Protein 7.6 g
  • Fibre 2.5 g

Here are a few notes to help make this for different dietary needs

• You can use peanut free seed butter. You can use any nut or seed butter as long as you make sure it is at a drizzly consistently.

• Instead of eggs you can replace them with flax eggs. To make enough flax egg to replace the 2 eggs, mix 2 tablespoons of ground flaxseed with 5 tbsp of water and let set for 5-10 minutes before adding to the recipe.

• You can omit the protein powder but that will alter the protein nutritional content. You can use unflavoured protein powder or any flavour you wish. If you omit the protein powder, increase the rolled oats by ½ cup.

As you can see there are a lot of possible variations on this recipe. Change the seeds, add nuts, less seeds more chocolate chips, no chocolate chips but chopped peanuts instead. We could go on and on but I’d rather stop and let you have fun and make it your own.

Sugar Free Sweet Ice Tea

Sugar Free Sweet Ice Tea

  • Servings: 6 Servings
  • Difficulty: Easy
  • Print

Nothing says summer quite like sweet ice tea. To a diabetic or someone that is watching their calorie intake, this one is off their list. A standard sweet ice tea is 30 grams of sugar per 8 ounce glass. Here is a version that you can have without the guilt.

Ingredients

  • 8 bags of black tea
  • 4 cups of boiling water
  • 2 cups of cold water
  • 2/3 cup of Splenda
  • 1/3 cup of Stevia blend (heaping)
  • 1/8 tsp of baking soda

Directions

  1. Bring 4 cups of water to a boil.
  2. Take off the heat and add the 8 tea bags and stir.
  3. Cover and let sit for 30 minutes.
  4. Removed the tea bags, squeeze gently.
  5. Add 1/8 tsp of baking soda and stir
  6. Add the Splenda and Stevia and stir until completely dissolved.
  7. Add the 2 cups of cold water and stir.
  8. Put in fridge to finish cooling.

Nutrition Per Cookie

  • Calories 12
  • Fat 0 g
  • Sugar 0 g
  • Carbohydrates 12 g
  • Protein 0 g
  • Fibre 0 g

Is this identical to southern sweet ice tea, no. But it is a good second cousin to it. The stevia cuts the after taste of the Splenda. You can still enjoy the flavour without worrying about the sugar content.

You can dress it up with lemon, orange slices, mint, or any combination that you like. After all, what good is a recipe if you can’t have fun and make it your own.

Oatmeal Muffins

Oatmeal Muffins

  • Servings: 12 Muffins
  • Difficulty: Easy
  • Print

Who doesn’t like muffins? I know I do but when I look at the calories on the store bought or coffee shop muffins, I have to do a hard pass. I came across this recipe and thought how bad can this be? Well to my great surprise, they are quite tasty.

Ingredients

  • 1 egg
  • 1 cup of skim milk
  • ¼ cup of unsweetened apple sauce
  • 1-1/3 cup of all purpose flour (I use unbleached white flour)
  • ¾ cup of oatmeal
  • 1/3 cup of stevia blend
  • 2 tsp baking powder
  • ¼ cup of unsweetened dried cranberries
  • ¼ cup of chopped walnuts

Directions

  1. Preheat oven to 400F. Spray a muffin tin or put liners in pan.
  2. In a large bowl beat together the eggs, milk and apple sauce.
  3. In a medium bowl, combine flour, oatmeal, stevia, baking powder and salt.
  4. If you are adding fruit and nuts, lightly coat with about 1 tablespoon of flour so they won’t stick to the bottom of the muffin or batter.
  5. Gently stir the flour and fruit mixtures into the egg batter until combined, do not overmix the batter so your muffins will stay light and fluffy.
  6. Fill muffins tins about 2/3 of the way up.
  7. Bake at 400 for about 8 minutes then lower your oven temperature to 350 and bake for another 8 minutes or until a cake tester inserted in the centre comes out clean.
  8. Cool the muffins in the pan for 5 minutes, then transfer to a wire rack to cool completely.

Nutrition Per Cookie

  • Calories 116
  • Fat 2.7 g
  • Sugar 3.8 g
  • Carbohydrates 26.9 g
  • Protein 4.51 g
  • Fibre 1.43 g

You can store these at room temperature covered for 3-4 days. You can also freeze them in a freezer bag for up to one month. You can thaw them on a wire rack or reheat the frozen muffin in the microwave for 20-30 seconds.

I was generally surprised that I didn’t taste the stevia. You can use Splenda which is a little sweeter but some people say they can taste the Splenda.

You can change the fruit, nut, decorate it if you feel like it. This version is great for all diabetes but feel free to have fun and make it your own.

Blueberry Cornbread Muffins

Blueberry Cornbread Muffins

  • Servings: 12 Servings
  • Difficulty: Easy
  • Print

These blueberry cornbread muffins are made with healthy options like honey and blueberries. And who can’t use more muffin recipes that are healthy and just delicious

Ingredients

  • 1 c all purpose flour (I use unbleached white flour)
  • 1 c cornmeal
  • ½ tsp of salt
  • 2 tsp baking powder
  • 2 tsp lemon zest
  • 1 large egg
  • 1 c milk (I used no fat protein Lantancia milk)
  • ¼ c olive oil
  • ¼ c honey
  • 1 c blueberries

Directions

  1. Preheat oven to 375F. Spray a muffin tin or put liners in pan.
  2. In a large bowl, combine flour, cornmeal, salt, baking power and lemon zest. Whisk until the ingredients are evenly distributed.
  3. Combine the egg, milk, olive oil and honey in a second bowl, then whisk until smooth.
  4. Pour the wet ingredients into the dry ingredients and mix until just barely combined.
  5. Add the blueberries and fold in using a rubber spatula
  6. Divide the batter evenly between the muffin cups.
  7. Put in oven and bake for 22-25 minutes, or until a toothpick inserted into the centre comes out clean.
  8. Cool the muffins in the pan for 5 minutes, then transfer to a wire rack to cool completely.

Nutrition Per Serving, 1 regular sized muffin

  • Calories 162
  • Fat 1 g
  • Sugar 7 g
  • Carbohydrates 23 g
  • Protein 3 g
  • Fibre 2 g

If you don’t have lemon zest available, you can substitute ½ tsp lemon extract or 2 tbsp of lemon juice. Both whole wheat flour and gluten free flour work well for these muffins.

If using whole wheat, increase the honey to 1/3 cup. To use frozen blueberries, defrost in a colander under cool running water, shake to remove as much moisture as possible, then pat dry with paper towels before adding to the batter. You can add some raw sugar for a little crunch.

These are great at room temperature or you can heat in the microwave for 30 seconds. If you change the recipe while having fun and making it your own, let me know. I’m always willing to try new things.

Healthy Banana Muffins

Healthy Banana Muffins

  • Servings: 12 Servings
  • Difficulty: Easy
  • Print

Muffins, who doesn’t like muffins? If I go anywhere near a donut shop, I’m walking out with a muffin. Even their healthier versions are still so high in sugar and fat thus making it not a great choice. And I’m sorry, but there are only so many bran muffins a girl can have. So here, a low fat, low sugar muffin that tastes great and you won’t feel guilty having.

Ingredients

  • 4 tbsp of unsweetened apple sauce
  • 1/3 cup of honey
  • 1 cup of mashed ripe bananas, about 3 medium
  • 1/4 cup of low fat milk, I used Lantancia high protein fat free.
  • 1 tsp of vanilla extract
  • 2 large eggs
  • 1-1/2 tsp ground cinnamon
  • 1 tsp of baking soda
  • 1/2 tsp of salt
  • 1-1/2 cups of flour (I used unbleached white flour)

Directions

  1. Preheat oven to 350F. Spray a muffin tin or put liners in pan.
  2. In a large bowl, put apple sauce, honey, mashed bananas, milk and vanilla in bowl and whisk to combine.
  3. Add the eggs and whisk thoroughly.
  4. Spinkle the cinnamon, baking soda and salt over the wet ingredients. Until well combined.
  5. Add the flour to the bowl and stir with a large spoon or spatula until just combined. Be careful to not overmix.
  6. Scoop the batter into the prepared muffin tin, about 2/3 but if you use a thick silicon liner like I do, then it’s almost full.
  7. Bake for 20-25 min or until a toothpick comes out clean when inserted into the centre. Mini muffins will take about 10-12 minutes.
  8. Let muffins cool in pan for 5 minutes, then put them on cooling rack. Serve warm or at room temperature.

Nutrition Per Serving, 1 regular sized muffin

  • Calories 144
  • Fat 5 g
  • Sugar 10 g
  • Carbohydrates 23 g
  • Protein 3 g
  • Fibre 2 g

Lots of little extras here. You can make 12 regular sized muffins or 36 mini muffins. To store them, put in airtight container at room temperature for 2-3 days or 4-5 in fridge. They also freeze well. Once completely cooled, then you can put them in an airtight zip-top bag for up to 3 months. Thaw and serve at room temperature. It was suggested that if you put the muffins diagonally on the cooling rack, they reach room temperature quicker.

And now for the having fun part, you can add chopped nuts, chocolate chips, fresh or frozen blueberries, I swapped the butter for apple sauce but you can use 4 tbsp of butter for a richer taste.

You can make it with wheat flour but this will make them healthier oh and a little heavier. Gluten free use 1:1 gluten free flour blend for the flour. You can make this egg free by using 2 tbsp of flaxseed meal and 5 tbsp of water. Let the mixture rest for 5 minutes before adding to the wet ingredients. (I’ve never tried it but I hear it works). The riper your bananas, the sweeter it is. It is also a little higher in sugars and glucides.

So as you see, you can have fun and make these your own.